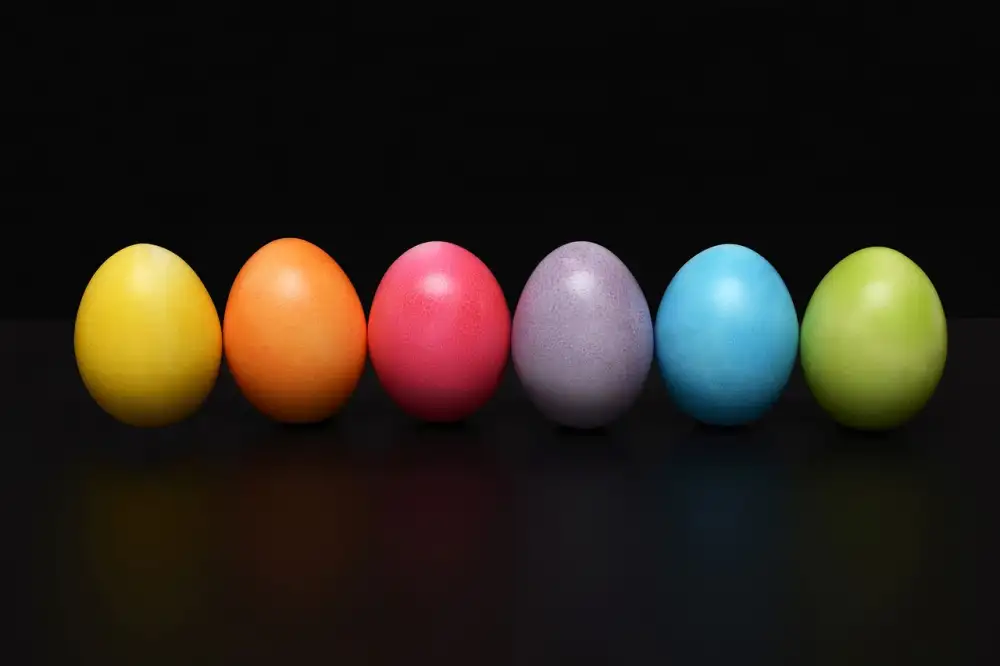
Vibrant Delights: Unleash the Magic of Food Coloring to Dye Eggs
- Gather the necessary materials for egg dyeing
- Prepare the eggs for dyeing
- Create the dye mixture using food coloring
- Submerge the eggs in the dye mixture
- Allow the eggs to soak and achieve desired color intensity
- Remove the eggs from the dye and let them dry
- Optional: Add additional designs or patterns using food coloring
Easter is a time of vibrant celebrations and one beloved tradition that adds an extra touch of magic to the festivities is dyeing eggs. While there are many methods available, using food coloring to dye eggs offers endless possibilities for creating stunning and unique designs. With just a few simple steps, you can transform ordinary eggs into colorful masterpieces that will delight both young and old alike. So let's dive into the world of egg dyeing with food coloring and unlock the secrets to creating vibrant delights!
Gather the necessary materials for egg dyeing
To embark on the delightful journey of dyeing eggs with food coloring, it is essential to gather all the necessary materials. First and foremost, you will need a dozen or more hard-boiled eggs. Make sure they are cooled down before starting the dyeing process.
Next, acquire a variety of food coloring in vibrant shades. You can find these in most grocery stores or specialty baking shops. Opt for liquid food coloring as it blends easily and produces more intense colors.
Additionally, prepare several small bowls or cups to hold the dye mixture. It's best to use glass or ceramic containers to prevent staining. Have enough bowls to accommodate different colors if you wish to create a multicolored egg display.
Lastly, gather vinegar and water for diluting the food coloring. Vinegar acts as a fixative and helps the dye adhere better to the eggshell. Aim for a ratio of 1 tablespoon of vinegar per cup of water.
With these materials at hand, you are ready to dive into the enchanting world of egg dyeing using food coloring!
Prepare the eggs for dyeing
To prepare the eggs for dyeing, start by hard-boiling them. Place the eggs in a single layer in a saucepan and cover them with cold water. Bring the water to a boil over medium heat, then reduce the heat and let them simmer for about 10-12 minutes. Once cooked, carefully remove the eggs from the hot water using tongs or a slotted spoon and transfer them to a bowl of ice water. Let them cool completely before proceeding with the dyeing process. This will ensure that the dye adheres evenly to the eggshell and prevents any cracking or damage during handling.
Create the dye mixture using food coloring
To create the dye mixture, you will need food coloring in various vibrant shades. Start by filling individual cups or bowls with water, leaving enough room for the eggs to be fully submerged. Add a few drops of food coloring to each cup, adjusting the amount depending on how intense you want the colors to be. Experiment with different combinations to achieve unique hues. Stir the mixture well until the color is evenly distributed. Remember, the more food coloring you add, the deeper and richer the color will be on your eggs.
Submerge the eggs in the dye mixture
To achieve vibrant and beautiful colors on your eggs, it's time to submerge them in the dye mixture. Carefully lower each egg into the bowl of dye, making sure they are fully submerged. Gently stir the mixture to ensure even color distribution. Allow the eggs to soak for at least 5 minutes, or longer if you desire a deeper hue. Remember, the longer you leave them in the dye, the more intense the color will be. Keep an eye on them to avoid over-dyeing. Once you're satisfied with the color intensity, carefully remove the eggs from the dye using a spoon or tongs. Place them on a paper towel or drying rack to let any excess dye drip off. Be cautious not to smudge or touch them while they dry. Patience is key here as it may take around 15-20 minutes for the eggs to fully dry.
Allow the eggs to soak and achieve desired color intensity
Allow the eggs to soak in the dye mixture for at least 10-15 minutes. The longer they soak, the more vibrant and intense the color will be. If you prefer a lighter shade, you can remove them earlier. For a deeper hue, leave them in for a longer period of time. Keep in mind that different colors may require different soaking times. Monitor the eggs closely to achieve your desired color intensity.
Remove the eggs from the dye and let them dry
Once the eggs have achieved the desired color intensity, carefully remove them from the dye mixture. Gently lift each egg out using a spoon or tongs, being cautious not to smudge or smear the colors. Place the dyed eggs on a wire rack or paper towel to let them dry completely. This process usually takes about 15-20 minutes, but you can leave them for longer if needed. Avoid touching or moving the eggs while they are drying to prevent any unwanted marks or smudges. Once dry, your vibrant and beautifully colored eggs are ready to be admired and enjoyed!
Optional: Add additional designs or patterns using food coloring
Once you have achieved the desired color intensity on your eggs, why not take it a step further and add some extra flair? With food coloring, you can unleash your creativity and create unique designs or patterns on your beautifully colored eggs.
To get started, gather a few small bowls or cups and mix different colors of food coloring with water. You can use a toothpick or small paintbrush to apply the colored mixture onto the eggs. Experiment with different techniques like dots, lines, swirls, or even stencils to create stunning designs.
For a marbled effect, gently roll the egg in multiple colors of dye before allowing it to dry. The colors will blend together beautifully, creating a mesmerizing pattern that will surely impress.
If you're feeling adventurous, try using household items like rubber bands or stickers as stencils. Place them on the egg before applying the food coloring mixture for an added touch of creativity.
Remember to let each layer dry before adding another design or pattern to avoid smudging. Once you're satisfied with your creations, allow the eggs to dry completely before displaying them proudly.
Adding additional designs or patterns using food coloring is a fun and artistic way to elevate your dyed eggs. Get creative and enjoy the process of transforming plain eggs into vibrant works of art!
Now that you have learned the art of dyeing eggs with food coloring, it's time to marvel at your creations. Admire the vibrant hues and intricate patterns that adorn each egg. Whether you choose pastel shades or bold, vibrant colors, these eggs are sure to bring joy and delight to any Easter celebration.
Remember, the possibilities are endless when it comes to using food coloring to dye eggs. Experiment with different color combinations and techniques to create unique designs that reflect your creativity. Don't forget to involve the whole family in this fun activity, as it is a great way to bond and create lasting memories.
Once your eggs are dry, display them proudly in a decorative basket or use them for an exciting Easter egg hunt. These beautifully colored eggs will surely be the highlight of any festive gathering.
So go ahead, unleash the magic of food coloring and transform ordinary eggs into vibrant delights. Let your imagination run wild and enjoy the wonder of creating edible works of art. Happy egg dyeing!
Published: 03. 12. 2023
Category: Food